Masthead header

WM

It was a total joy to be a part of Sarah and Ryan’s big day.   The love they share together is abundant and clear to anyone who happens upon them together.  I don’t think that there was a point in the day, (even amongst her tears) that I saw Sarah stop smiling.  This girl had a fabulous grin plastered on her face, thanks to Ryan all day.  Ryan was such a sport to put up with not only the heat, but also myself–I would keep saying, “okay I think we are good” and then something else unmissable would strike me.  And not only did he have to deal with just me and my lens, but he was kind enough to let both Jenn Van Wyk and myself take pictures of him.  (Check out her blog, she’s awesome!)

Anyhow, what could have been a grumpy rainy day turned out to be a most perfect sunshiny day any bride could ask for.  And what a BEAUTIFUL bride Sarah was 🙂  Check out my favorites from their big day:

SladichBrunker-223voWM

So Handsome!

SladichBrunker-230WM

His guys…

SladichBrunker-07WM

Beautiful!

SladichBrunker-222bwwm
SladichBrunker-97WM

Her Girls…

SladichBrunker-250wm

The whole gang…

SladichBrunker-10WM

LOVE!

SladichBrunker-15WM

Congrats you guys! Thanks for letting me create memories of your day!

ISO

Essentially, (and originally) since the age of digital film ISO became known synonymously as film speed.  We say “ISO” because the system used to measure the film’s sensitivity to light was developed by the “International Organization for Standardization.”

To understand this, you must know what film speed is.

Film Speed
Simply put, film speed is the measure of film’s sensitivity to light.  In the digital era, we essentially tell our computer (camera) how sensitive we want it to be.(i.e. we adjust the ISO)


When you have film that is relatively insensitive (ISO100), more exposure to light is needed to produce the same image density as a more sensitive film (ISO800).  This would be why insensitive film is called “slow” film.  Think about it.  If you change the exposure/shutter speed to stay open longer, it takes longer to capture the image.


In correspondance, highly sensitive films are called “fast films”.  However, the reduction of exposure corresponding to use of higher sensitivities generally lead to reduced image quality.  (Graininess, and noise).  Basically the higher the filmspeed (higher ISO) the worse the photo quality.


So, What is ISO again?


In Digital Photography

ISO measures the sensitivity of the image sensor. The same principles apply as in film photography – the lower the number the less sensitive your camera is to light and the finer the grain. Higher ISO settings are generally used in darker situations to get faster shutter speeds (for example an indoor sports event when you want to freeze the action in lower light) – however the cost is noisier shots. I’ll illustrate this below with two enlargements of shots that I borrowed from here

the one on the left is taken at 100 ISO and the one of the right at 3200 ISO

According to DigitalPhotographySchool.com, 100 ISO is generally accepted as ‘normal’ and will give you lovely crisp shots (little noise/grain).

Most people tend to keep their digital cameras in ‘Auto Mode’ where the camera selects the appropriate ISO setting depending upon the conditions you’re shooting in (it will try to keep it as low as possible) but most cameras also give you the opportunity to select your own ISO also.
When you do override your camera and choose a specific ISO you’ll notice that it impacts the aperture and shutter speed needed for a well exposed shot. For example – if you bumped your ISO up from 100 to 400 you’ll notice that you can shoot at higher shutter speeds and/or smaller apertures.

When choosing the ISO setting you should ask yourself the following four questions:

  1. Light – Is the subject well lit?
  2. Grain – Do I want a grainy shot or one without noise?
  3. Tripod – Am I using a tripod?
  4. Moving Subject – Is my subject moving or stationary?

If there is plenty of light, you want the most crisp image possible, and especially if you are willing to use a tripod on a still subject you will be safe using a pretty low ISO rating.

However if it’s dark, you don’t mind grain or even want grain, and if you aren’t using a tripod or the subject is moving, or both, use a higher ISO, so you can shoot with a faster shutter speed enable to expose the shot as good as possible.  However be aware that your shots will be a bit “noisier”.

Situations where you might need to push ISO to higher settings include:

  • Indoor Sports Events – where your subject is moving fast yet you may have limited light available.
  • Concerts – also low in light and often ‘no-flash’ zones
  • Art Galleries, Churches etc- many galleries have rules against using a flash and of course being indoors are not well lit.
  • Birthday Parties – blowing out the candles in a dark room can give you a nice moody shot which would be ruined by a bright flash. Increasing the ISO can help capture the scene.

Most people never take their cameras off of Auto ISO–if your one of those people that’s OK.  But now at least when you purchase your next camera, you’ll know why the camera with ISO up to 3200 is going to be more expensive than ISO up to 1000! 🙂

Smiles!

I had a fabulous trip to Florida last week.  I enjoyed some time in the water, on land, and in stores!  What more could a girl ask for?  I also got to catch up with some great friends I hadn’t seen in over five years, along with my best girlfriend whom no matter how frequently we get to visit each other is never soon enough!

Here are some of my favorite shots from the adventure:

Cheers!

Hello Friends!!  It has been too long–I just got home from a fabulous and productive trip to Florida, less than a week ago and things are certainly in full swing!  Check back later in the week for a blog post from the {Sladich/Brunker} wedding I recently shot with Jenn VanWyk!

I went to Florida with one mission and one mission only–to find my wedding dress and my bridesmaids dresses for my July 2011 nuptuals–and, well, Mission Accomplished!!  And I LOVE LOVE LOVE them all!  However I must admit, I got more excited about picking out all of our shoes!

Anyhow, more on that later–for now we need to discuss Flare and Guide Numbers!  This week we are going to go over two topics in one post, since I missed last week’s lesson due to my mini hiatus! Enjoy!

Flare!

Most commonly, and simply put: Flare is light that doesn’t belong in an image (or does it?).  This light usually takes the shape of the aperture, and usually is caused by shooting toward the light source.  Or shooting with the light source in-front of you rather than behind you. When flare happens in an image, the contrast in the image reduces.  And often colors become sort-of washed out.

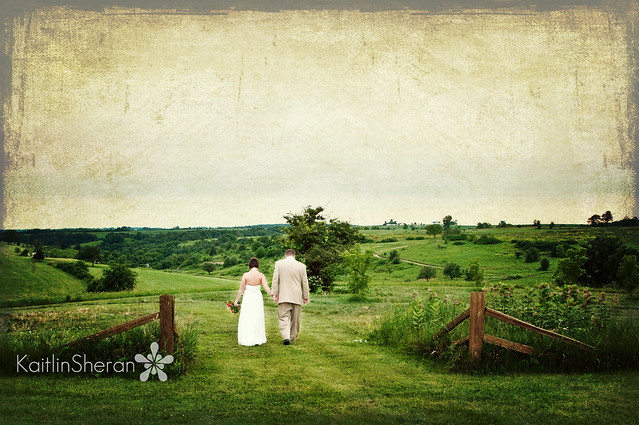
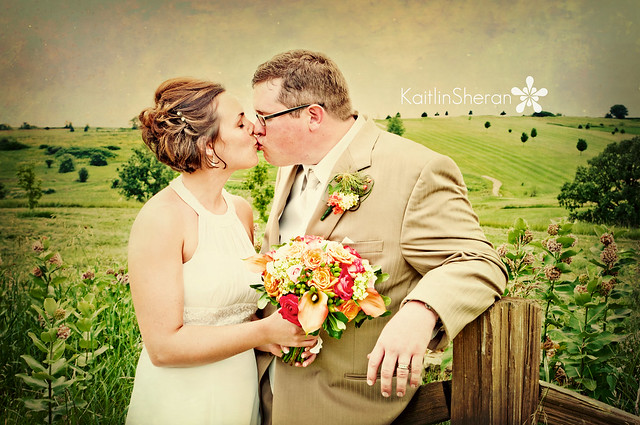
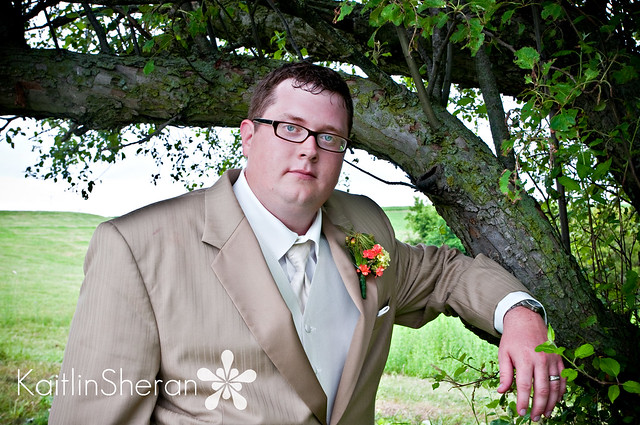
Here are some examples from my recent engagement shoot:

While I achieved the look I was going for with these images, sun flare can also ruin an image if you aren’t careful.  It takes a lot of practice to really be able to achieve the look you want.  If you are interested in learning how to get a little flare in your shots, don’t be afraid to shoot into the light!! I know I know, it seems so against the grind–but really it can be a lot of fun!

Here are some tips to help you achieve the artistic sun flare you desire:

1. Shoot into the Sun: To me, this is rule number one!  Lens Flare is caused by strong rays of light directly hitting your lens and causing a slight sun burst. Capitalizing on the direction of your light is the key to capturing Lens Flare.

2. Backlighting!: Place your subject in front of you, with their back to the sun. Your subject will be backlit as though you were capturing a silhouette.

3. Use Manual Mode: Your camera will expose the scene for the total amount of light in the photo. If you follow the camera’s metering, you will be left with a silhouette as it tries to compensate for the amount of light. Shooting on Manual will enable you to over-compensate for the backlight, so your subject is perfectly lit – even with the over exposed background.   You just have remember that you have to overcompensate!  If you aren’t used to using manual mode, the hardest thing, in my opinion, is to remember to fix your exposure number!  Remember if you shoot in the sun you need to compensate for the shade! ( Expect to miss a great shot or two (or ten) while learning manual mode!)

4. Shoot at an angle: Because you want an image with Lens Flare [and not simply over exposure], you need to remember one thing: Camera position to the sun. This will largely depend on what time of day you shoot. In the mornings or evenings, you will have an easier time of shooting directly into the sun. But at mid day this changes. You will need to position yourself fairly low to the ground in order to shoot into the sun.

5. Watch your focus: Your camera typically will focus on the object best lit in your frame. Shooting into the sun will make it more challenging for your camera to focus on your subject. You may need to switch from auto focus to manual focus (but in my opinion that can be equally as difficult!).

{Thanks to Digital Photography School for these great tips!}

Guide Number

The guide number  serves as a guide to proper exposure when using flash.  When the guide number
is divided by the flash-to-subject distance, the correct aperture for proper exposure is determined. Guide numbers may be quoted in meters or feet, according to which system is used for the measurement of distance.  I’ll admit, this is NOT my area of expertise.  However, on beginning-photography tips.com there is a very informative piece on flash photography that I found very helpful.  I hope you do too!

{A flashes efficiency is determined by its power, or light output. A more powerful flash will have a greater output and reach subjects that are farther away. Also with more powerful flashes a smaller f-stop can be used for greater control of depth of field.

The way to determine the power of a flash is to check the owners manual for the flashes Guide Number (GN). GN’s range from 40 to 160, with 160 being the most powerful. GN’s are determined by the manufacturer, based on ISO, flash zoom and light output control. GN’s change with adjustments of the flash zoom and light output.

If you are comparing flash units GN’s, make sure the numbers are based on equal factors. Different manufactures may base there numbers on meters instead of feet, or they may base the GN on different film speeds.

The GN can be used to determine exposure settings. Dividing the GN by the distance between the flash and subject will give you the f-stop number. Most flash units will have a calculator or chart to help figure exposure settings.

GN’s were determined my the manufacturer in average conditions, such as an indoor white room and neutral subjects, so the GN is not the only factor used in determining exposure. For instance, if you are shooting outdoors, with no walls that bounce light, you may need to adjust the f-stop down.}

I will post a separate posting for my Florida pictures.  I decided, by the way, that since all the pictures were taken in Florida, I could make an exception and not capture only F images 🙂

Happy Shooting!!